About to get your first resin tank? Then have a quick look through this guide by Stefan Kellhofer, taking you through the types of tools and techniques to get the best from your resin.
Warlord Games produces fantastic miniatures in metal, plastic and resin. This guide will help you work with the least commonly used of the three materials, resin.
Resin is a synthetic compound that can be used to cast miniatures with fantastic detail. Here at Warlord Games you will often see resin used to create our Bolt Action vehicles or stunning scenery pieces.
Tools
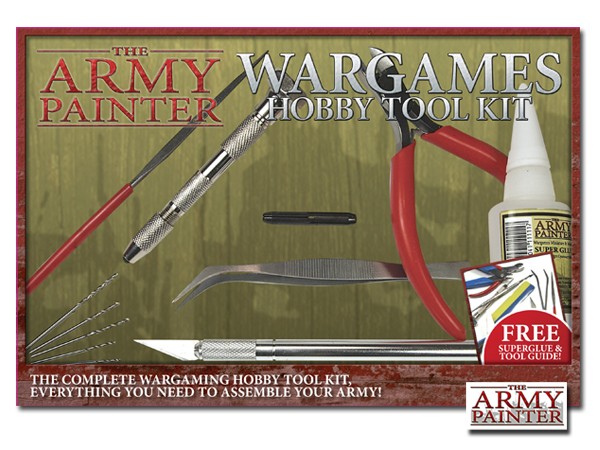
Like most things in life, working with resin can be aided with the use of good quality tools. All of these tools can be purchased from our online store and they will provide you with everything you need to get started with resin.
Hobby Knife

A sharp knife is an essential purchase when working with resin, as often the surface of the resin needs to be scraped or cut in order to remove any imperfections from the casting process. It is important to be careful when using a hobby knife as they are sharp and accidents can happen.
We would also recommend purchasing a cutting mat to protect your work surfaces from knife slips and cuts. This will also help protect you from parents/spouses/siblings as you turn the kitchen table into your workbench!
Clippers

Clippers can be used to remove larger pieces of resin from the model, or to remove the model from the sprue. It is important to ensure that you use a gentle touch with clippers to make sure that you don’t take a chunk out of your beloved new model.
Saw

A Razor saw can be used to achieve perfect cuts when working with resin. Razor saws are often delicate and need to be used carefully to ensure that the teeth do not break whilst in use. We also recommend using a clamp or vice to hold the model steady, whilst you keep your hobby fingers out of the way.
Hand Drill

Small hand drills (also known as pin vices) have a variety of uses when working with resin, they can be used to drill holes to represent battle damage, holes in order to ‘pin’ two sections of the model to add strength to a join, or to hollow out a gun barrel to produce a realistic effect. We don’t recommend using an electric drill for resin, as it will often do more damage than good.
Files & Sandpaper

Filing and sanding your resin model to achieve a perfect finish in preparation for your stunning paint work is an important part of using resin. It is important to use a variety of gradients of sandpaper, in order to achieve the desired effect without removing most of the delicate detail on the model.
Super Glue

Super Glue is the best way to glue your new resin kit together. A good quality super glue will ensure that your model will survive the rigours of battle in one piece. Should there be any accidents, super glue can always be used to repair resin models.
Important Note: Although resin looks similar to plastic, plastic glue will not work on the resin and merely lead to a sticky end.
Dust Mask

There is no direct health risk when working with our resin, although a dust mask is recommended as any dust particles can act as an irritant to your lungs.
Green Putty

Kneadite Green stuff is a two part putty – mix equal amounts of the two colours until you get an even green – you’ll then have a little while to work the putty into areas as a filler or add your own extra details. Use a little water to help prod & smooth the green stuff into the shape required.
Get Started!
Check the components

Make sure that all of the pieces of the kit are there and check for any miscasts or warping in the model. All of Warlord Games resins are checked in production and packing, but if anything isn’t to your satisfaction, please contact us and we can replace any missing or damaged pieces to your kit. Once you are sure that the kit is complete, lay the pieces out ready for preparation.
Preparation
Once you are happy that the model is complete and ready to be built, remove any excess resin from the model using your hobby knife or clippers. These are an unavoidable part of the casting process and are easily removed with the correct tools. The most common types of excess resin are:
Mould lines

Mould lines are similar to those found on plastic or metal models and are a product of the casting process. In order to release the model from the mould, the mould often has release cuts that ensure the new resin model does not break as it is removed from the mould.
Mould lines can be removed by scraping carefully with a hobby knife. It is important to be careful with resin as it is significantly softer than metal and scraping too hard can damage the surface of the model. Any imperfections left from the removal of mould lines can be rectified with the use of fine files or sandpaper to file the surface smooth although many will be covered when you spray the model with an undercoat.
Gates and Vents

Any pieces of resin that are not part of the model are often gates or vents. These are a part of the casting process that allows resin to be poured into the mould (gates) or air to be released from the mould (vents). These can be removed by clipping the offending piece of resin from the model. Clippers are a tool that can really damage resin if used improperly, so ensure that you are clipping the excess resin and not the model. Practice on a spare piece of plastic to ensure you have the feel for them. Any marks left after removing the gates or vents can be smoothed and filed to create the perfect finish.
Flash

Flash is very thin resin produced during casting that can be removed by scraping it away with a hobby knife. Flash can also be removed by brushing the model with an old toothbrush, and any remaining flash removed with sandpaper or needle files.
Warping

One of the wonders of resin is that it can be warmed up and reshaped slightly. If you feel that any part of the model is slightly warped, merely immerse the piece in hot water for 30 seconds and bend into shape. Hold in that position until the resin cools again. Please don’t use boiling water as it will be too hot to hold and will undoubtedly damage the resin. A hairdryer on a medium setting can also be used to heat the resin, although care must be taken to ensure that the model does not become too hot.
Assembly
Once you have cleaned up each of the components of your resin miniature, we recommend that you dry fit the model to check that there will be no issues when glueing the model together. This means putting the model together without glue to identify any uneven joins that should be removed in order to produce a better fit. These uneven joins can be sanded or filed in order to produce a flat join between pieces of the model.
Once you are happy that the model is cleaned up, use superglue to glue the pieces together. Don’t worry about any gaps in the model, once the glue has set, these can be filled in using green stuff or milliput and sanded smooth.
Once you are happy with the assembled model, get your undercoat and paints ready, because you are now on the home straight to the tabletop!