A Warlord favorite Dan Hoyt from Red Over Blue has come up with a fantastic way to re purpose all that pillow stuffing that you may have been using for Christmas decorations:
Dan: Smoke is an oft underused tactical tool in wargames, especially so in Bolt Action. Useful for covering an advance, or obscuring friendly forces while breaking contact in a withdrawal, smokescreens can be an effective method of breaking up large open areas. In Bolt Action the most common method for throwing smoke is with mortars and on-board artillery, though Forward Observers can also call larger smokescreens from off table. I find the light mortar is perfect for throwing smoke rounds downrange, as it is cheap, its HE is usually ineffective, and most importantly it can fire while on an advance order.
This means it can start throwing those smoke rounds onto the table starting on turn 1. Though the Bolt Action rulebook uses the opponent to place any missed smoke rounds, I prefer to use a house rule and a good old fashioned 40K scatter die to vary the impact of any errant rounds. Therefore, an effective tactic is to bring the light mortar onto the table and just start lobbing those smoke rounds across your line of advance, and then base your own movements on where the smoke happened to land. Since I am such a big fan of using smoke, I wanted to model something for the table that would take the place of the cotton balls I had up to then been using to mark smoke rounds.
Materials/Tools Required:
- suitable bases (mine were custom lasercut from Warbases)
- any basing materials as needed (gravel, static grass etc)
- polystyrene plastic tubing, approx 3mm
- ornament hanging wire (small gauge wire)
- pillow stuffing
- PVA glue
- super glue
- grey aerosol primer
- white aerosol primer
- insulation foam
Step 1: Base Preparation and Smoke Cannisters

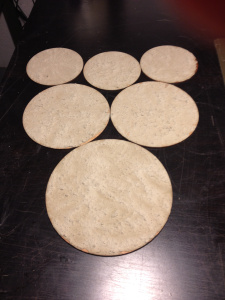
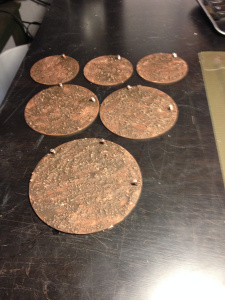
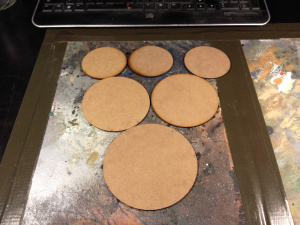
The sizing of my bases was based (pun intended) on the smoke template sizes as outlined in the Bolt Action rulebook. I chose to go with 3x 3″, 2x 4″, and 1x 5″ circular bases, custom cut out of 2mm MDF.
I textured these bases as per my standard basing method, but I will not outline this method in detail as you will want to complete your bases to match your own style.
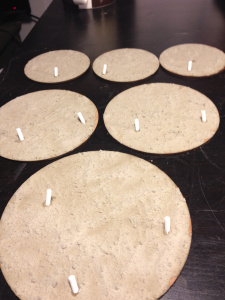
Next, cut some small sections of the polystyrene tubing, approx 5-8mm in length. These are to represent the smoke cannisters or bombs for the templates. I included 1 per 3″ base, 2 per 4″ base, and 3 per 5″ base. This allows me to tell at a distance what size smoke is represented, merely by looking at the number of cannisters. I cut these with a slight bevel at one end, so they will appear to be sticking out of the ground at an angle.
Glue these into the bases, offset towards one edge with the acute angle facing towards the centre of the base so that the smoke will billow onto the larger area of the circle. Prime the bases and complete the basing as per your own method, ensuring the basecoat the cannisters in a neutral colour (I chose olive drab).
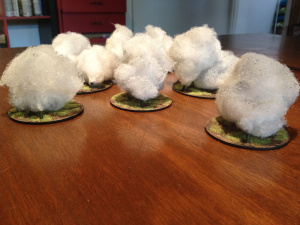
Step 2: Smoke Cloud Construction
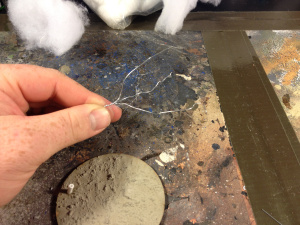
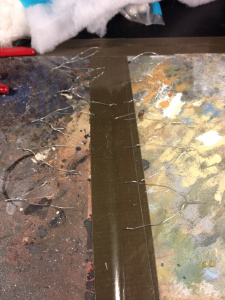
The smoke clouds that billow out of the cannisters are constructed of pillow stuffing with a wire frame. Begin by constructing the frame with small (approx 4″ strips) of ornament wire, with three such strips twisted into a small tripod (one per cannister).
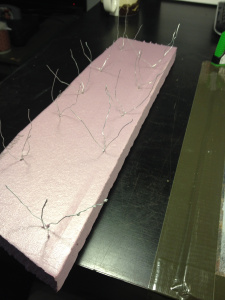
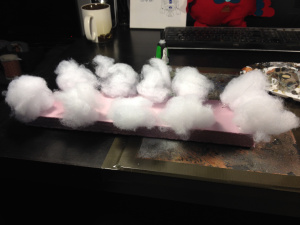
The wire tripod should have a twisted section small enough to fit into the polystyrene tubing of the cannisters. Array the wire tripods on a section of insulation foam with the twisted end pressed firmly into the foam. Coat each wire strip (the tripod legs) with PVA glue, pressing each leg into a large-ish (about the size of a fist) ball of pillow stuffing. This will take some fiddling to get the shape and size correct, but once you have these smoke clouds the way you like them allow the PVA to dry completely.
Step 3: Smoke Cloud Painting and Assembly
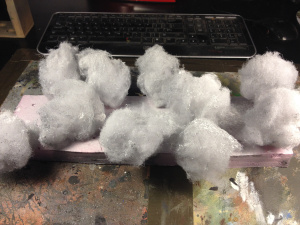
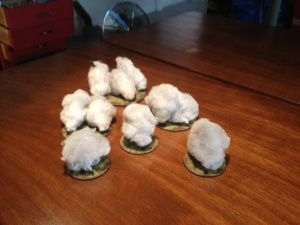

With the smoke clouds and their wire frames dry, prime them with a medium dusting of grey aerosol primer. This will add some depth in the shadows of the clouds, and help to breakup the overall white colour. Once this layer is dry, give the clouds a light dusting with with aerosol primer. Once dry, simply pull the clouds up out of the insulation foam and assemble. Place a glob of superglue into the open end of each cannister and insert the twisted wire end. It may also be worthwhile to glue down the edge of the smoke clouds that touches the base itself. Apart from that, the templates are now complete.
I am very happy with the way these simple templates turned out, especially as they took me less than an hour of work total in order to complete. Combining the smoke with the Warlord firepower lights really adds to the effect on our battlefield.
![firepower-lights-1980-p[ekm]300x213[ekm]](http://www.warlordgames.com/wp-content/uploads/2012/02/firepower-lights-1980-pekm300x213ekm.jpg)
Do you have an article within you? Are you itching to show your collection to the world of Bolt Action? Then drop us a line with a couple of pictures to info@warlordgames.com


