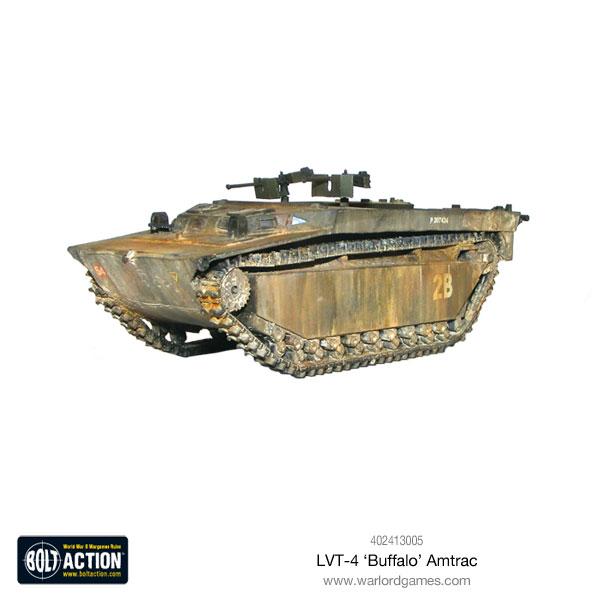
Today I’ll be covering the LVT-4 Buffalo Amtrac, Buffalo for short, and how I painted this versatile transport vehicle for my Iwo Jima-themed USMC force. With its dual 50 calibre machine guns, tracks, and loading ramp, this small amphibious landing craft suits several roles that my force depends on. For this Buffalo, I will model it after an OD green landing craft used by the 1st Marine Amphibious Tracker Battalion.
The Basecoat

After having primed the vehicle in several light coats of black primer, I went about establishing a basecoat of Vallejo Model Colors (VMC) U.S. Dark Green 70.893. I did several passes making sure to make thin, even coats around the model. Once applied, I let the model cure for at least 24 hours.
Colour Modulation


Being a vehicle with broad surfaces and angles, I wanted to create some depth but creating some colour modulation effects. These effects would make the broad surfaces visually more appealing to the eye. I intentionally push the colours on my subjects to be almost “too bright” for what they’re supposed to be. However, with the many subtle layers of oils, filter, washes, and weathering effects, the modulation becomes more subdued and aids in creating a very realistic look to vehicles.
For the first highlight of modulation, I used a mixture of 50/50 VMC U.S. Dark Green and Vallejo Panzer Aces (VPA) French Tankcrew 320. I’m careful to avoid the recesses and the block off any areas that I don’t want any of the highlight to hit. Once the first highlight is done, I mix in Ammo of Mig’s Matt White paint into the mix at a 50/50/ ratio to create an ultra-highlight. I apply this colour in a very controlled manner on the very high edges of my modulation sections. To ensure that I create smooth transitions and maintain control, I do several very light layers of this final highlight.
Detail Work


With the colour modulation out of the way, I take my brush and go around to paint the different details on the craft. I left the machine guns off until the very end to ensure that they didn’t get in the way of my work. I painted the machine gun shields with VPA French Tankcrew 320 and painted the machine guns themselves with Ammo of Mig’s Matt Black. For the line retrieval hooks, I painted those with VMC German Camo Black Brown 70.822. I then used the same colour to paint the tracks of the Buffalo.
For the hatches, edges, and hinges around the vehicle, I used Vallejo Model Air’s (VMA) U.S. Grey Light 71.045. I deliberately used this colour to make such features stand out on the Buffalo as to ensure they wouldn’t get lost among everything else. Combined with later washes, this is a great technique to bring out details in a vehicle. Also, I used this point in time to add tiny scratches and imperfections in the paint to simulate wear and tear.
After I completed the detail work with my brushes, I applied decals to the model and even added my own bit of crew graffiti to the rear ramp. Once these bits were done, I clear coated the model with several very light passes of satin varnish with my airbrush.
Oils, Filters & Washes


At this point, I wanted to bring out the contrast and build tones on the LVT. This step is more art than science, so I approached it at my own discretion adding and taking away elements and colours that I thought were too overwhelming. I broke out my Ammo of Mig washes and filters and went to town creating tones all over the broad surfaces. First, I used the Brown for Dark Green filter followed by the Green for Grey Green filter. I made sure to add the filters depending on the different panels. I did this to give each section its own look. Once the filters were dry, I applied a panel wash with Ammo’s Africa Korps Wash to each panel and part that I wanted to line. Once the wash was done, I cleaned up any excess with a brush moistened with odourless white spirits.
Weathering Streaks & Pigments


Once the panel washes were done, I added some streaking effects using various Ammo products such as Pacific Dust and North Africa Dust. I applied these products at the top of the various panels and dragged the tip of my brush down in swiping motion to create lines. Once these lines were dry, I faded them with a brush moistened with odourless white spirits.
Once the streaks were done, I went around to various parts of the vehicle and added accumulations of pigments. I did this sparingly for two reasons: less is more in this case as too much pigment can make anything look a bit clunky and unrealistic, and the second being that as this will be used in games, I didn’t want my hands to remove too much of the pigment as I push it around the board.
Finishing Touches


With the pigments dry, I wanted to create a variance in the different textures of dirt and dust. I went around the vehicle and added some Fresh Engine Oil by Ammo and added some Wet Effects also by Ammo. These created spots of both damp and dry around the vehicle giving the dirt a “wet but drying” look. To cap the vehicle off, I placed the machine guns and called it finished.
I hope this tutorial was both informative and gave you a good insight into how I approach my armoured pieces for an army. Each armoured piece is different and presents their own challenges and opportunities but my approach is similar for each one.
By Jacob Richards
-1-37mm-AMTANK-04")
-4-75mm-AMTANK-01")