Fighting Retreat – The Battle of Boulogne, May 22nd, 1940
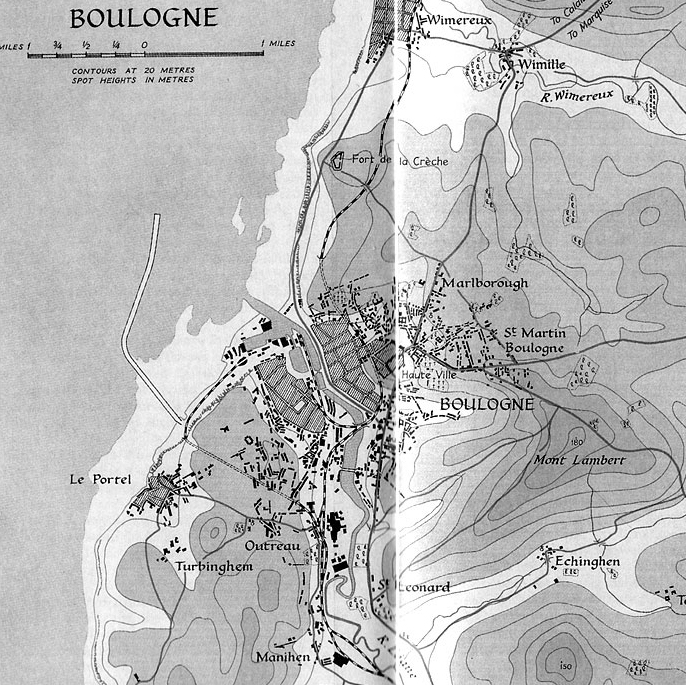
The skies were still a little darkened as the small convoy, led by the 1500 tonne destroyer HMS Whitshed, crawled through the near still waters on their approach to Boulogne harbour. With the dawn sun just peering over the horizon and the ships’ engines rumbling at low power, the nervous chat of British soldiers onboard the 2500 tonne turbine steamer Biarritz and the smaller SS Queen of the Channel intensified at the sight of pillars of black smoke drifting up into the skies ahead. Just offshore, a French oil tanker was still ablaze from being bombed by German aircraft; as the ships came alongside it was also evident that the docks themselves and the surrounding buildings were shattered by relentless attacks from Stukas. Crowds of panicked French civilians and wounded British soldiers barged and bustled along the entire length of the harbour.
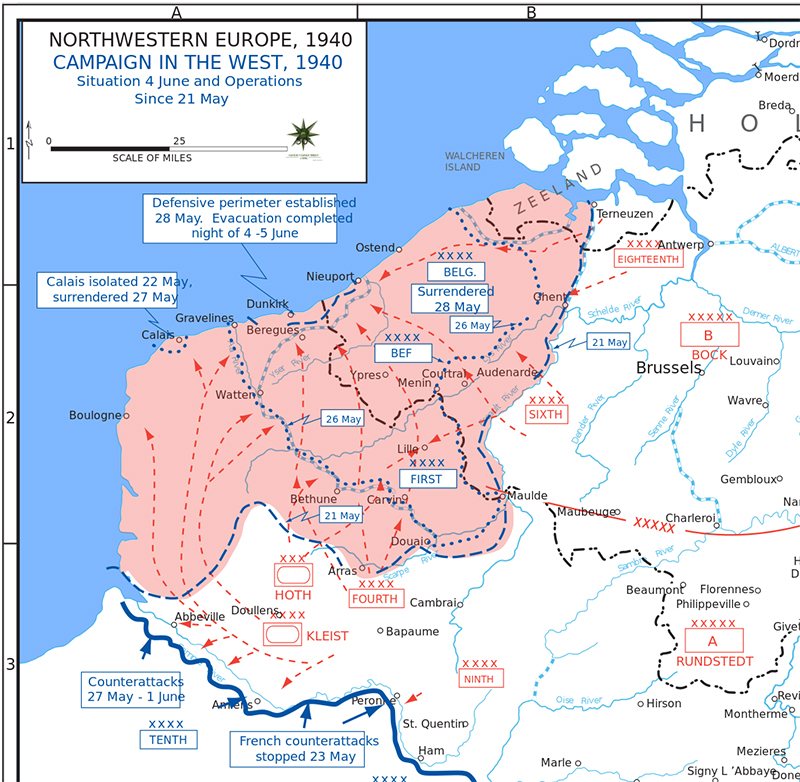
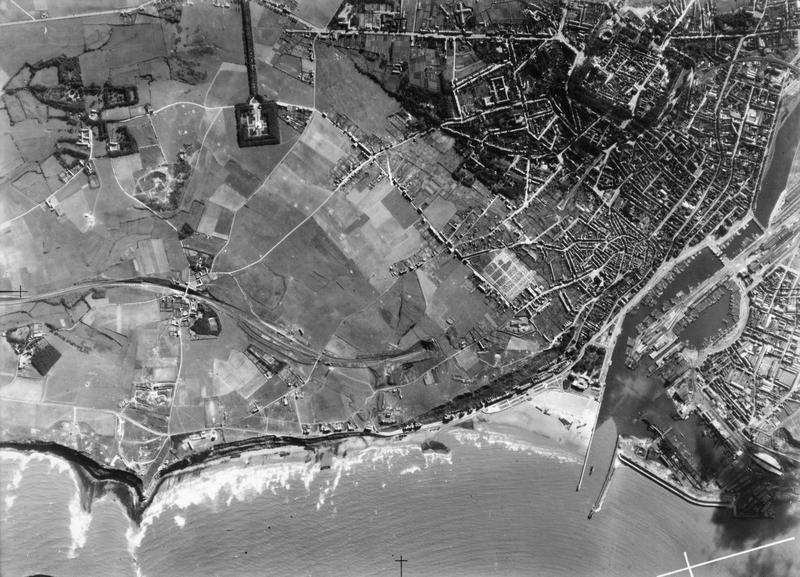
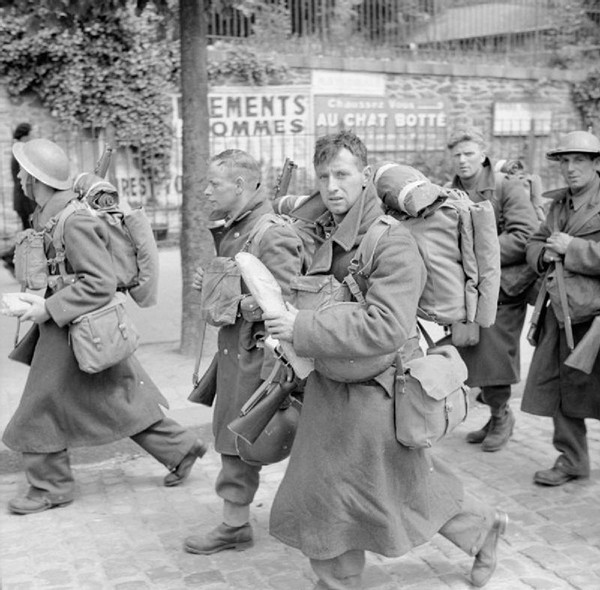
The convoy was ferrying men of the 20th Guards Brigade to secure the vital port of Boulogne as the German XIX Army Corps was sweeping its way westward across northern France. The British Expeditionary Force was in retreat and the soldiers of the Irish and Welsh Guards had been tasked with the vital mission of securing Boulogne to keep the supply lines open and, should German forces continue to gain the upper hand, maintain a safe passage for a full withdrawal from France.
Whilst the Guardsmen had within their ranks many pre-war professional soldiers, there was also a large number of barely experienced men who had joined up after the outbreak of the war; the only real experience of fighting in a modern theatre came from the handful of men who had been part of Harpoon Force in the Netherlands only two weeks before. The British force consisted of the 2nd Battalion Welsh Guards and the 2nd Battalion Irish Guards, made up of 972 and 720 soldiers respectively. These augmented a substantial force of French soldiers and were further assisted by some 1500 ranks of the Auxiliary Military Pioneer Corps, although though the latter force was made up to a large extent of middle aged and elderly reservists or volunteers with very little military training and an unenviable reputation for poor discipline. Equipment was also lacking; none of the heavier 3” mortars had been brought with the force and only a single unit of four 37mm anti-tank guns had arrived with the Guards’ first wave; the main anti-armour capability lay in the hands of the underpowered Boys anti-tank rifles.
It was not long after disembarking that the Guardsmen realized the situation was critical and that there job was not to keep the supply lines open; they were there to cover an evacuation. Surrounded by dead and wounded, using fixed bayonets to hold back panicking crowds of civilians from overwhelming them, the town around them already devastated by enemy bombing, morale was tested before German forces even arrived at Boulogne. The Guards suffered their first casualty when a young infantryman panicked at the overwhelming chaos which surrounded him and placed his thumb over the muzzle of his rifle before pulling the trigger to blow the appendage off and guarantee his own medical evacuation.
Orders came through from the force commander, Brigadier William Fox-Pitt: the Guards were to establish a defensive perimeter around the city and hold until the evacuation was complete. Streams of British and allied wounded and refugees continued to arrive as the Welsh and Irishmen moved to take up positions; a city fight was considered far from desirable and the threat of tanks against infantry in open country was also to be avoided – Fox-Pitt made the decision to dig his men in just outside the suburbs of Boulogne, with good fields of fire but options to fall back quickly if necessary. The Welsh Guards took position to the east of the town in a ‘V’ of four Companies, whilst the Irish dug in in a northwest to southeast line to the southwest of Boulogne. Road blocks were set up at as many junctions, cross roads and choke points as possible to slow German armour.
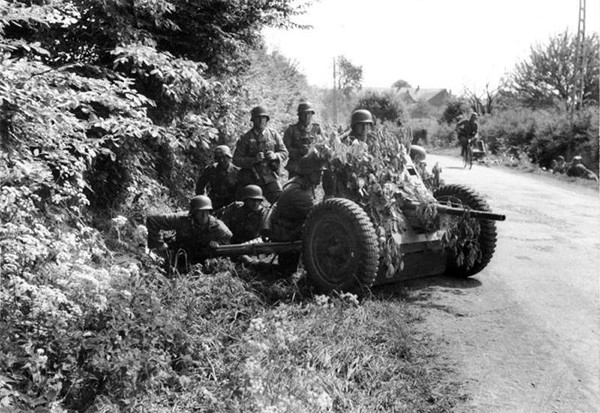
Meanwhile, the columns of XIX Army Corps’ 2nd Panzer Division were already approaching the area rapidly. The force was under the command of the legendary General Heinz Guderian; one of the chief visionaries responsible for the pioneering Blitzkrieg method of warfare, this strategic genius had already seen his theories proved to be outstandingly successful in Poland and the early rounds of the Battle of France. The Division swept towards Boulogne, harried along its route by regular attacks from the light bombers of the RAF which were operating from French airstrips. Scout units were sighted by the British defenders by mid afternoon on May 22nd and soon after the first engagements erupted.
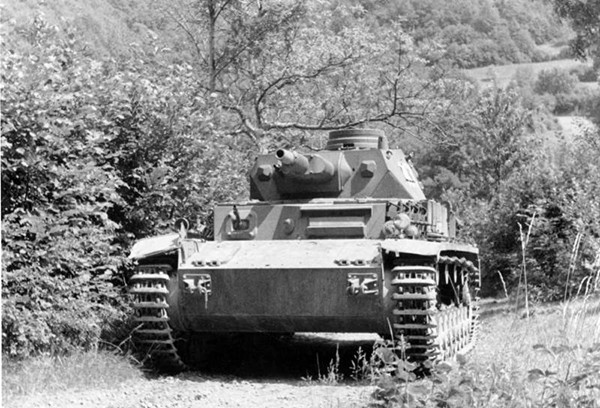
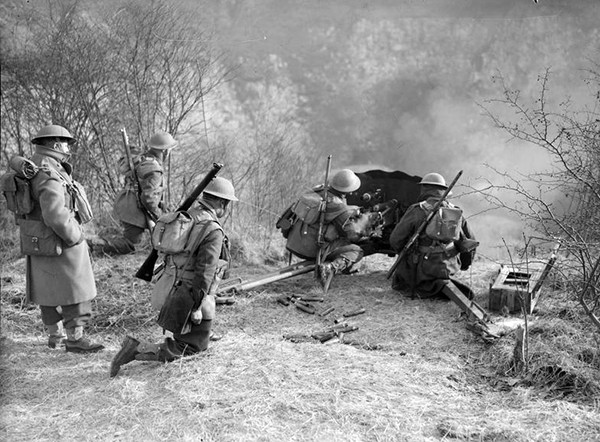
Panzer IIIs were soon locked in combat with British and French anti-tank guns dug in to the suburbs; the well camouflaged allied guns blunted the advance of the German armour, inflicting heavy casualties. However, supporting German motorcycle troops were quickly able to outflank, isolate and then eliminate the vital gun emplacements. Isolated fighting continued throughout the evening until after sunset; the experienced German soldiers continued probing attacks along the allied lines throughout the night, not with any intentions of a breakthrough but instead successfully revealing the majority of allied units by virtue of their return fire. By dawn, the soldiers of the 2nd Panzer Division had a good idea about exactly what they faced, and where.
Shortly after first light, the Panzer IIIs and Panzer IVs rushed forwards to assault the Guardsmen. The isolated, few anti-tank guns and Boys rifles attempted to slow the enemy tanks as Bren teams and riflemen poured fire into advancing motorcycle troops; makeshift road blocks made up out of debris and furniture proved to be surprisingly effective against German armour but this could only halt their advance; the Boys rifles were proving to be tragically ineffective – Welsh Guardsman Doug Davies later recalled seeing one German tank commander laughing at the completely ineffectual British fire from his position to the east of Boulogne. Return fire from the Panzers was causing significant casualties and it was quickly apparent that a British retreat into Boulogne was inevitable. As the Welsh fell back into the town, German soldiers moved up and sniper fire from a church tower in St Martin caused real problems for the men of 4 Company.
To the south, the Irish Guards were having problems of their own as they rapidly found themselves to be outnumbered and spread out far too thinly, with large gaps in their defense. The forward platoons of 1 and 4 Companies sustained heavy losses and by 0900 an ordered withdrawal was underway. By 1030 the Irish, too, had fallen back to the town.

Meanwhile, at 1000 hours, German artillery opened fire on the 19th Century Fort de la Creche which protected the harbour itself. The fort, manned by French troops, endured withering bombardment as German motorcycle troops moved into position to assault the fortification. Surrounded, outnumbered and crippled by accurate artillery fire, the French fort surrendered to the advancing German forces. Some time after 1100, Fox-Pitt received orders to evacuate all personnel of no military value, but to continue to hold his defensive line. The withdrawal was now beginning in earnest. By early afternoon, British defensive positions had fallen back to within a kilometer of the harbour itself. Still, the tenacity of the defenders impressed the Germans, as recorded in XIX Corps’ War Diary:
“…in and around Boulogne the enemy is fighting tenaciously for every inch of ground in order to prevent the harbour falling into German hands… 2nd Armoured Division’s attack therefore only progresses slowly.”
Hampered by snipers as the fighting moved from street to street, the Guardsmen made an orderly and disciplined retreat to the quayside, barricading and blocking as many roads as possible as they did so with barrels, furniture and abandoned vehicles. Now the defensive perimeter was almost impossible to differentiate from the hundreds of BEF wounded, civilians and other non combatants which crowded the dock area.
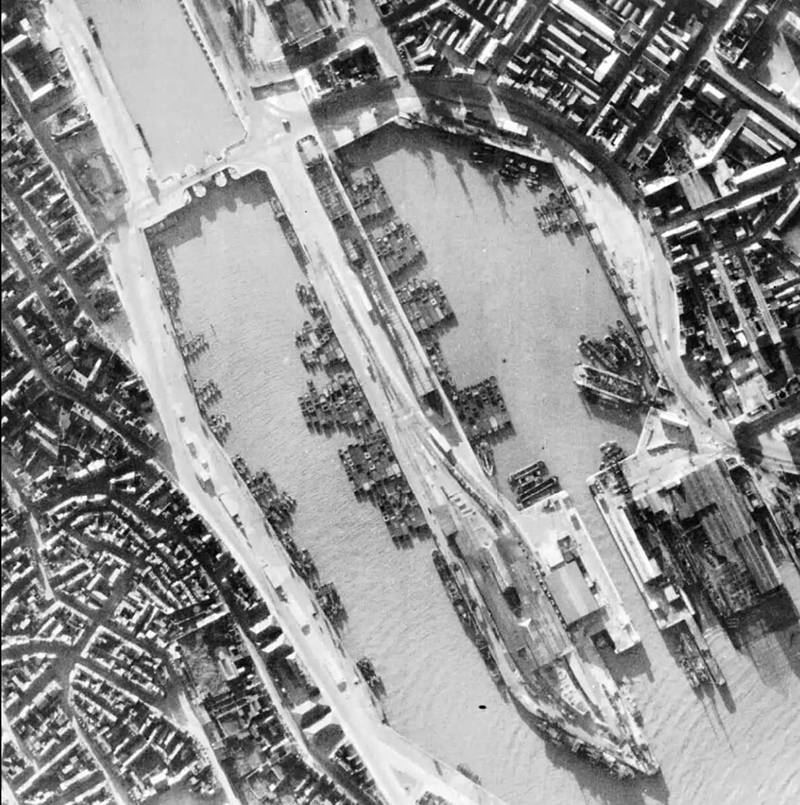
Now the warships and civilian vessels alike began steaming in to evacuate personnel by the hundred. Wounded and civilians were frantically ushered aboard the first destroyers with firefights between the Guardsmen and Panzer troops not only within earshot but now well within visual distance. The situation was beyond desperate; one Royal Naval Midshipman proceeded ashore to establish communications with the shore party and on rounding a corner found himself face to face with a German tank. With allied forces now occupying a tight perimeter, offshore French destroyers began to bombard German forces approaching the outskirts of Boulogne.
By 1800, armed with constant updates of the situation in Boulogne, the Prime Minister himself ordered the complete evacuation. French soldiers were still tenaciously defending the medieval fortifications at Boulogne’s Haute Ville, and their CO, General Lanquetot was neither consulted nor notified of British intentions. As the evacuation continued, German bombers filled the skies above the harbour and rained down in deadly dive bombing runs before RAF Spitfires appeared in their midst. So close was the fighting by now that the Captains of the destroyers HMS Keith and HMS Vimy were both killed by sniper fire as they stood in the bridges of their own warships. German soldiers had also captured French coastal guns at Fort de la Creche and one of these opened fire on the British ships. The final confirmation of German victory was a line of Panzer IVs which stood along the waterfront, ferociously bombarding the destroyer HMS Venetia as she navigated the narrow channel. The old warship was wracked with shell fire, losing a turret and sustaining damage to the bridge as well as being set ablaze. However, the return fire from the Royal Navy destroyers was cataclysmic – several tanks were destroyed by direct hits from the warships’ 4.7 inch main guns and the captured coastal guns were silenced forever.
The Welsh and Irish Guards, based on all accounts of the battle from both British and German sources, gave a tremendous account of themselves. Whilst a German victory was inevitable the disciplined and orderly fighting retreat bought as much time as possible to save as many people as possible. Of Lieutenant Colonel Stanier’s Welsh Guards, 623 arrived back in Britain; Lieutenant Colonel Haydon’s Irishmen saw 201 killed or missing – both forces had lost some 1/3 of their numbers, with many men still in hiding in Boulogne after being unable to reach the quayside, or still fighting on the outskirts after orders of the withdrawal never reached them. Their brave sacrifice was not in vain – over 4300 British, French and Belgian troops and civilians were successfully evacuated.
Battle of Boulogne Scenario
It is late morning, May 23rd. German forces have attacked the line of Guardsmen to the south and the east of Boulogne, and the retreat has begun. British forces have now fallen back to the city but their orders are to delay for as long as possible. German units are attempting to punch a way through the defenders to take key objectives in Boulogne.
Forces
German forces receive a 20% points bonus due to their numerical superiority in the area. Forces may be selected using the ‘1940 – The Battle of France’ reinforced platoon selector from ‘Armies of Germany’ (although Waffen-SS units are not permitted) or in accordance with the Armoured Platoon Selector as described in ‘Tank War’. British forces are taken from the force selector in ‘Armies of Great Britain’s’ ‘1940 – Fall of France’ list. If a light anti-tank gun is taken, it is most likely that the guns used were Bofors 37mm; this counts as a light AT gun with a wheeled carriage, gun shield and crew of 3.
However, the following units may not be selected: Forward Observer, Medium Mortar, Field Artillery, Anti-Aircraft Gun, or ANY armoured cars, tanks, tank destroyers, self-propelled artillery or anti-aircraft vehicles. 1-2 of the 2 Regular Infantry sections (early war) which are taken as mandatory force selections in the reinforced platoon may be replaced by Inexperienced Infantry sections (early war) if desired. Britain’s free Forward Artillery Observer cannot be included.
Special Unit – Auxiliary Military Pioneer Corps
Up to 2 sections from the British 0-4 Infantry Sections may be made up of AMPC units.
| Cost: | Inexperienced Infantry 20 pts | |
| Composition: | 1 NCO and 4 men | |
| Weapons: | None | |
| Options: | ||
| – Add up to 5 additional unarmed soldiers at +4pts each. | ||
| – Up to half of the unit may be armed with rifles at +3pts each. | ||
| – The entire squad may have anti-tank grenades/Molotov cocktails for +2pts per model. | ||
| Special Rules | ||
| – Tank hunters (if anti-tank grenades/Molotov cocktails taken). | ||
| – Green. | ||
| – Barricade Builders: If the unit spends two consecutive turns within 1” of a building and surrenders their order dice on both turns, a morale check may then be made. If successful, a new road block is immediately constructed within 1” of any model in the unit. |
Set-Up
The table should be set up (available scenery permitting) to represent an urban area, with road routes allowing armoured vehicles to transit from the German table edge to the British edge. The British defenders pick a table side and must set up all forces in ‘Zone 1’ in accordance with the diagram below:
German Table Edge
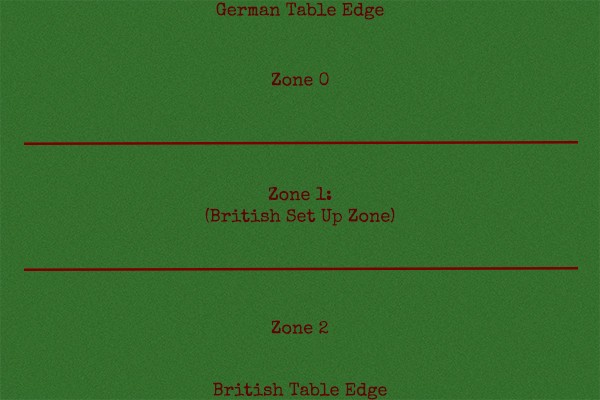
Each Zone must take up 1/3 of the table; on a standard 6’ x 4’ table, each Zone should be 6’ x 16”. If limited urban scenery is available then this should be set up in Zone 2 to represent the British digging in just outside the town.
Road blocks may be placed by the British player to span any road in Zone 1 or Zone 2. Only one road block may be placed for every route allowing German armour to cross the board and exit along Zone 2’s edge.
If available scenery does not allow for an urban map, British forces begin the game as ‘dug in’. A dug in unit counts as ‘down’ when shot at even if its not down (an additional -1 to hit and the number of HE hits halved), If the unit goes ‘down’ while dug in the benefits of being ‘down’ are doubled. Units count as Dug In until they move. If possible mark the locations of the vacated foxholes so they can be reoccupied or captured by the enemy later. Any British units may start the game in ‘ambush’. Due to German scouting attacks during the previous night, British units may not use the Hidden Set-up rule.
The German attackers are not on the table to start with. The German player must nominate at least half of their force as a first wave. This can be the entire force if the player wishes. Any units not included in the first wave are left in reserve. Outflanking is not allowed as the table represents just one segment of the front line; similar engagements are happening simultaneously to the left and right.
Objective
The British player must carry out a controlled withdrawal before exiting the board. British units cannot exit the board before turn 6. The German player must advance across the table to leave the board via the British edge, whilst eliminating enemy opposition.
First Turn
The battle begins. During turn 1, the German must move all of their first wave onto the table. These units can enter the table from any point on the attacker’s table edge, and must be given either a run or advance order. No order test is required for first wave units.
Special Rules – Road Blocks
British forces have placed road blocks at key points along the routes across the table. Vehicles may only attempt to cross these road blocks on an ‘advance’ or ‘run’ order. Only vehicles with a damage value of 7+ or greater may attempt to overrun road blocks. For any vehicle attempting to cross, roll a D6:
1: The vehicle has becoming stuck in place, thrown a track or snapped an axel. The vehicle is immobilized for the rest of the game.
2-3: The vehicle is slowed by the road block. Another ‘advance’ order must be given next turn and another D6 thrown to consult this table; however, a repeat throw of 2-3 results in the road block being successfully traversed.
4-6: The road block is crushed by the vehicle and removed from play.
Road blocks can be destroyed by gunfire. They count as having a damage value of 6+ and can only be destroyed by HE; other weapons simply punch holes in the road block.
Game Duration
The game lasts for 7 turns.
Victory!
The British score 1 victory point for each British unit occupying Zone 1 at the end of Turn 4. 2 Victory Points are scored for each British unit which exits the board from the British table edge during Turn 7. The Germans score 2 point for each British unit destroyed. 3 victory points are scored for each German unit which leaves the table from the British edge. A clear victory is won by scoring 2 or more victory points more than the adversary. A 0-1 point spread is considered to be a draw.
Do you have an article within you? Or even a scenario to share with the world of Bolt Action? Then drop us a line toinfo@warlordgames.com or share with all over at the Warlord Forum