Top painter Paul Cubbin shows how he got on with our plastic Spartan miniatures – in his own inimitable style. Plenty of hints and tips here!

This painting guide was originally published in Wargames Illustrated magazine. We’ve recreated it here with their kind permission.
Paul: The hopeless courage and tragedy of the last stand of the Spartans and their Allies at Thermopylae in 480BC is arguably the most celebrated example of self-sacrifice in military history.
This step-by-step guide is a walkthrough of how I painted the elite of the elite, the Spartan bodyguard of King Leonidas, and will hopefully help those who wish to bring these famous heroes of the Ancient World to the -top.
 On It!")
So Why The Spartans?
The Spartans (okay, more correctly called the Laconians or Lacedaemonians, but it’s all Greek to me) have always been something of an obsession of mine, ever since I read Steven Pressfield’s historical fiction novel ‘Gates of Fire’, which centres on the legendary last stand at Thermopylae. Inspired by the story of this martial race and their world famous warriors, I then picked up any and all titles on the subject I could find. Of course, the graphic novel ‘300’ and the movie of the same name have thrust the subject even further into the spotlight, artistic licence, alarming thongs and all.
If anyone with an interest in military history had somehow missed them before, then surely by now everyone must at least know something of the flavour of the Spartans and Thermopylae.
So, having chosen the Spartans as my next project I very soon decided on painting the King and his bodyguard. If you’re going to aim for the best, why not aim for the best of the best? The evidence is a little hazy on exact details from this period, which could be a problem for button-counters yet on the other hand, gives the more laid back collector the perfect opportunity to make their own rules up as regards appearance. I guess I’d class myself as a laid back button-counter so I’m not sure if this helps me or not.
Model Citizens
Having thus decided on the subject, much chin rubbing then followed as I tried to settle on exactly what miniatures to buy. Being naturally miserly and trying to save up for a spectacular set of pectoral implants as well, I obviously wanted to spend as little money as possible whilst still getting very nice models that would paint up well. I wanted to buy plastics if possible, mostly from a cost perspective, but also because metals seem so old hat these days… perhaps a trilby or a bowler.
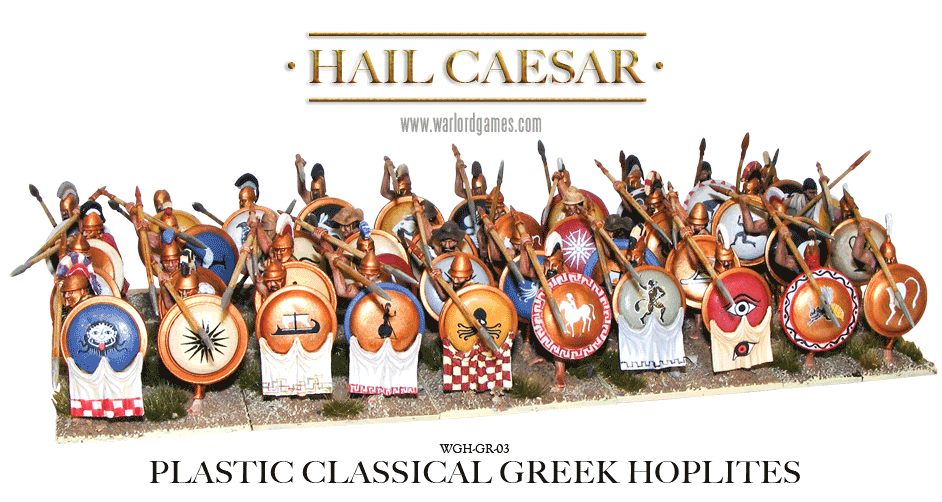
It was via Warlord Games’ online forum that someone first mentioned to me Immortal Miniatures’ plastic Greeks (Note: Immortal Miniatures have since been bought by Warlord Games!). To be honest, I’d never even heard of them, but when I had a peek at their boxed sets I very quickly blew the moths from my interweb wallet and made my purchase. They have several different variations on the Ancient Greek hoplites and I eventually chose the set with the extra bronze-armoured torsos, having decided I wanted the entire bodyguard to be clad in metal.
When the box arrived I was dismayed to find that out of a possible 24 full models, only 7 could have bronze armour, including the additional torsos! Perhaps I should have topped up with some of Immortal’s metal sets after all! Some kind and helpful swapping from nice people on the forum solved this however, and eventually I had everything I needed to proceed. One 18-man elite unit, with King Leonidas included, was about to be brought to life!
The Making of the Man
The first thing to note about the figures is that my initial disappointment about the ratio of armoured torsos aside, they are really nice and well-researched models. I have never in my life seen so much detail on the rear of a shield arm. Now my firm recommendation for anyone attempting to follow in my wobbly footsteps is to paint the shield arm separately from the rest of the model. I have tried some with and some without, and doing each part individually was by far the easiest. So the models were assembled relevant to their two ranks – front rankers with spear raised overhead, rear rankers with spear held at port.
 On It!")
The bare canvas.
It is at this point that you may have noticed the helmet is of the closed Corinthian type instead of the simple Pilos shape that is so often identified with the Spartan hoplite. Thermopylae was fought right at the start of the 5th Century BC and over the course of that century, they saw a lot of changes to their appearance and the Pilos was among them. I decided that as well as the helmet, I also wanted each warrior to have an individual shield decoration instead of the famous lambda insignia.
As I said, historical details are kind of sketchy, but most of what I have read on the subject seems to agree that the lambda did not appear until later, during wars between the various Greek states. However, I did want to hint at some form of regimentation and discipline, so I decided to paint the tunics in identical shades of red, albeit with individual hem decoration, but more on that masochistic and soul-destroying decision later. In fact, I didn’t want the overall colour scheme to vary from a basic red, white and black where possible. For now, I had to stick these fellas onto temporary individual bases for painting and get them undercoated.
 On It!")
Eyeing Up the Boys
There was just one more thing to go on the models before they could expose themselves to the undercoat. To really distinguish these Spartan models further from other Greek hoplites I modelled some simple hair braids with ‘greenstuff’ modelling putty onto the figures. The Spartans had four braids hanging down at the back and two each either side of the face at the front. It was a simple enough job on one model but on 18?
I’ll be honest, halfway through I began to regret my obsessive streak and started dreaming of easier hobbies, like crocodile dentistry or extreme self-immolation. By rolling tiny wee thins of putty and sticking them over the existing hair strands in the right places I was then able to poke at them with a pin to get a suggestion of texture. It may seem a petty thing, but I did like the effect and no-one could accuse them of being the slightly suspicious Athenians or the distinctly duplicitous Thebans. They were most definitely Spartans, real men through and through who weren’t afraid to oil each other up and braid each other’s hair before battle. Urm…
Anyhoo, I tend to undercoat black these days most of the time and this was to be no exception. To make sure the shield arms would be easy to stick on later, I masked off the shoulder where it would fit on each torso with a blob of tac (oddly enough, it was the colour of the sky) before spraying. After making sure all the tricky bits the spray can’t reach had been given a good brush over with black paint, I next turned my unreliable attention to the flesh tones and that eternal conundrum, the eyes!
Oh yes, this old chestnut. I have heard a lot of arguments for and against – some will assure you that eyes cannot be seen from a distance and thus should not be represented on models headed for the wargaming table, whereas some will assert that without eyes a model cannot be brought to life. I always try to paint at least the hint of eyes onto my models, because so many of them are destined for more close-up photography than Paris Hilton’s intimates. Yet even I had not attempted to put eyes inside a closed Corinthian helm before. Should be a doddle. Ahem.
 On It!")
What d’ya wanna make those eyes at me for?
Now, this is my own take on how to paint eyes, so if you’re all sitting comfortably, I shall begin… After the flesh basecoat has been applied I splodge an off-white cream colour all over the general eye area. I use an off-white because pure looks too glaring, especially from under hats or helmets. Since these eyes were buried deep inside bronze plates I plumped for quite a deep cream shade. Then when dry, the eyes were shaped with more of the flesh base colour. After they are shaped into a nice Clint-style squint, the dark brown iris is dabbed in and Robert’s your mother’s brother! It’s that simple.
Well, okay, if I’m being honest, there was a lot of swearing and more than one repaint when an unfortunate hoplite became cross-eyed or cyclopean due to the vagaries of my wobbly hand and patchy depth-perception. But I won’t tell anyone if you don’t and what the eye doesn’t see, the painter gets away with.
A word about my own preferred painting style before we get our teeth into the meat of it; I’m a dyed-in-the-wool layerer. I start with a deep base coat, work my way through the midtones and end with a series of highlights. I use inks and washes but sparingly, although in truth this project saw a more than usual use of the ink wash.
I am of late trying to adapt my style to the finish I’m after, rather than adapting the finish I can achieve to the style I am used to, but I still use layering more often than not. Before Foundry brought out its three-pot paint system I had already built up a sizable collection of home-mixed shades I use most often, in ‘Base’, ‘Midtone’ (sometimes more than one midtone) and ‘Highlight’ in old paint pots.
This doesn’t mean I am limited to three stages since I often blend the stages for a more subtle colouration, but it does save an awful lot of time and hassle. Oddly enough, mixing my own shades gave me a greater understanding of how colours worked together and it’s something I would thoroughly recommend for anyone. If we rely too much on what a paint manufacturer tells us is the right shade, we lose our control over the colours we want on our models.
 On It!")
Anyway, the flesh tones were then completed using my usual layering method, making sure not to go over the top with the musculature. It’s sometimes easy to paint in rippling biceps too soon in the layering stage and end up with too much contrast in your lowlights. I was also careful to choose a shade I felt was appropriate to a Mediterranean complexion as opposed to a ‘Western’ or ‘European’ one, which is usually what you’ll find in a paint pot labelled ‘Flesh’ (unless you’re in a cannibal’s kitchen, in which case it’s probably best not to lift the lid).
This isn’t as easy as it sounds since although I didn’t want Leonidas’ elite guards to look like fresh-faced Etonians punting down the Thames, neither did I want them to look like Al Jolson on a Mississippi riverboat. In the end, I went for a shade that had the same sort of depth of colour as a European Flesh, but with more of a brown tint as opposed to a peachy one. I didn’t even have to mix it up since I already had something suitable left over from an old commission year’s back. Thus the café latte shades of my ‘Aztec Flesh’ were to be reborn as ‘Spartan Flesh’, which despite the title is not a special interest magazine – as far as I’m aware…
Of Tunics and Torsos
Well, the basic tunics were going to be no trouble; after all, they were just going to be plain old red, weren’t they? I mean, the odd bit of decoration on the hem wasn’t going to be a problem was it? Oh for the gift of hindsight. Now ‘free-handing’ as some people call it, is in essence very simple, just the painting of some form of decoration or detail on a model where it isn’t sculpted.
 On It!")
Real men aren’t afraid to show off their skirt decoration…
Despite the folds in the skirt of the material, I didn’t foresee too many difficulties in producing a simple Greek-looking design along the edge, just to add a little interest for the eye scanning across row after row of scarlet-clad hoplites. I Googled ‘Greek designs’ which gave me a couple of nice patterns and I duly sketched some of the simpler ones onto a piece of paper for reference.
Practice is always advisable when transferring patterns onto a model – either with the brush or just with a pen on a piece of paper – and your hand will remember the strokes if you’ve taken the time for a few dress rehearsals before the main performance.
The main colour of the tunic gave me no problems, a simple four-stage shade I had mixed up for British Redcoats. It’s something like a faded brick red like you’d expect to find in a dyed cloth that has seen its fair share of foreign suns and tiring campaigns. Then I set to work adding the hem décor. Oh dear Lord, that was the start of some horrible horrors. I cannot adequately relate the pain of my hunched, creaking spine and squinting eyes or the dragging torpor of seemingly never-ending tiny designs squeezed onto the unforgiving folds of the plastic topography.
 On It!")
Some models received a simple gold border, some received more complex upgrades and the reader must make their own choice if faced with the same choices. Suffice to say, if I had to do it again, there would be a lot more basic gold borders and a lot less Greek keys.
It looks good, but it took years off me. With the tunics done, the bronze armour and helmets were relatively simple. One base coat of bronze, a brown ink wash and gold highlights was all that was needed. That was it. After enduring the tunic decoration for so long, it all seemed suspiciously easy.
Taking up arms things were looking nearly done now and all that was left were those annoying wee stages that somehow seem to take forever, just when you’re looking forward to a well-earned rest. The spears were painted with iron heads and bronze butt spikes, with a pale wood shaft. I like painting just a little wood grain into such things, but as with the musculature, a little goes a long way so unless you want a very deep grain it’s best to leave your stripes until the last few highlights. By holding the shield arms (remember those?) in place I could see that most of the sword scabbard was going to be covered, so a simple brown leather base coat was all that was required on the front face, the leather straps were painted and the swords were given a simple bronze or iron hilt. The crests were painted in white, red or black and the hair braids were painted with a simple blue/black highlight. All that was needed now was for the shield arms to be added – now where had they gone again?
 On It!")
Weapons at the ready.
 On It!")
“This is my good side!”
Coming back with my shields; when the rest of the models were being undercoated, the shields were right alongside them the whole time. I didn’t tell you about them, just to build up the tension. In order to paint them all easily, I set up something like a production line, sticking the shields to a spare strip of plasticard with more of that tac of a certain colour. The parts where the arms were to be glued onto the torsos were masked off again with a small blob of tac, as with the main bodies. First I undercoated the outside of the shields, then when I was sure it was completely dry, I flipped them over and stuck them down again for the inside to be done. Since most, but not all, of the inside of the shield was obviously going to be obscured I didn’t want to spend too long on them.
 On It!")
Underarm protection for an active lifestyle.
 On It!")
101 uses for brown ink.
A simple flesh shade minus most of the highlights was sufficient for the arms and the rest was a mid-tone colour covered with a brown ink wash. The odd light highlight here and there where it would show was then flicked across and that was enough for those who wished to sneak a sneaky peek behind the shield. Any more time spent on it would have weighed heavy on my conscience. Now here I had to turn my attention to the outside of the shields. Before this happened I felt it was safe to glue the arms onto the rest of the model, touching up any tell-tale imperfections along the join with a dab of the faithful brown ink. The outside of the shields were all given a coat of bronze and then a brown ink wash as with the armour. Now they were ready for the designs. This gave me much to worry about.
The Immortal Miniatures box of plastic Greeks provides you with plenty of waterslide transfers for your fellows, so those of a nervous disposition (or wobbly hand) need not worry overmuch about freehanding intricate Hellenic devices on your shields. The problem is, I have only had one experience with waterslide transfers on models before and that was a particularly bad one.
It was then that I discovered the inherent problems one may encounter when trying to put a flat transfer onto a domed surface. Put simply, it doesn’t go. It creases, it rumples, it shreds when you savagely attack it in a blind fit of rage. The shield surfaces were all ever so slightly domed and the online tips at Immortal’s website suggested cutting small snips towards the centre of the larger transfers to prevent creasing.
Sadly when I tried this on the one really big transfer it resulted in shredding as above and then much turning of the air into the colour of tac. I resolved to try again with a medium-sized transfer and to my surprise, it worked perfectly. Surely this was a fluke, so I tried with the next one and the next one. They all worked just fine. Suspicious, but ready to accept this unlooked-for bounty, I continued.
 On It!")
Applying for a transfer.
Now I’m not the sort of person who can just accept a transfer as it comes off a sheet, I have to fiddle with it to make it my own somehow. It’s the same with food, I can’t just open a packet of something and follow the instructions, I’ve got to bung something foreign into it (like Jean Claude Van Damme) to spice it up a little. Thus each transfer had to be mucked about with in some way – a red outline here, a white swirl there – just to customise it a little. I can see it now, ‘Pimp My Shield’, the new blockbuster TV show.
Then there was just the little matter of damage and weathering. Before undercoating I had cut little chips off some of the shields to represent battle damage and I repeated this on the untouched areas of the shields too. Just a quick flick of brown ink (again with the ink?) with a light gold colour flicked across the underside gave the quick and simple effect of cuts and scrapes in the surface of the shield.
The gold highlights were gently applied across the tops of the shields and then a very pale beige dry brush across the bottom gave a simple but effective dusty finish. This same dusty dry brush was added to the lower legs as well since they had walked all the way from Laconia and this was in the days before Scholl sandals. Nearly there now, what I needed to do next was carefully remove the hoplites from their temporary bases and stick them to their permanent homes.
The Final Frontier
It was always my intention to base the hoplites on 20mm frontage plasticard bases and fortunately for me, loads of different sized bases of this frontage are included in the boxed set. I plumped for each row to have two bases of three models, one base of two models and one base of one model, to achieve the balance between convenient multi-basing, versatility for formation changes and also casualty removal. Eagle-eyed readers may notice that the Leonidas model has been included in the middle of a strip of three instead of being based on his own. I simply couldn’t imagine him being included in any Spartan force and not fighting in the front rank and if my bodyguard unit ever gets whittled down to him and his two minders, then let’s face it, I’ll have lost the battle anyway. I like to lightly score the surface of bases with a scalpel before attaching models because this helps to ‘key’ the surface for glueing on figures and basing materials. So after the hoplites were glued in place, strong wood glue was applied to the base and basing sand was added. The odd sun-bleached tuft of static grass and a basic dry earth colour later and voila! We have one completed unit ready for varnishing...
 On It!")
Form up lads.
 On It!")
All that hidden work!
Now I have teasingly referred to the Leonidas model a couple of times so far without really explaining where he came from. I’m such a tease. I chopped the legs from one model and stuck them onto the torso from another so I could have a bronze cuirass, bronze scale skirt and also bronze greaves. The spear arm raised in encouragement was achieved by chopping the hand from a rear rank arm and attaching it to the wrist from a front rank arm. All fairly simple conversion work so far.
His head was a little tricky, without being overly taxing. I took a standard head from the sprue and drilled a small hole to show an open mouth, repairing the lower lip and chin with greenstuff. The transverse crest was just two normal crests chopped in half and stuck together across the top of his head, with any gaps hidden with the trusty greenstuff again. He was given a slightly fancier paint job and grey hair (well, he was over 60 at Thermopylae after all) but other than that he’s pretty much equipped as one of the lads!
 On It!")
“Tonight we dine in Spiro’s taverna!”
There we have it, one rock-hard legendary unit of elite heavy infantry, well equipped to dish out bronze-clad spankings to anyone who dares defy them. It wasn’t an easy job, but it was relatively quick, I learned plenty during the experience and hopefully, now others will tread a smoother path without having to make the same mistakes I did – and it’s a great looking unit too, let’s not forget that. With any luck, this will encourage you to have a bash at painting up some Greek hoplites (and especially Spartans) to help defend Western civilisation and tavernas everywhere.
~ Paul
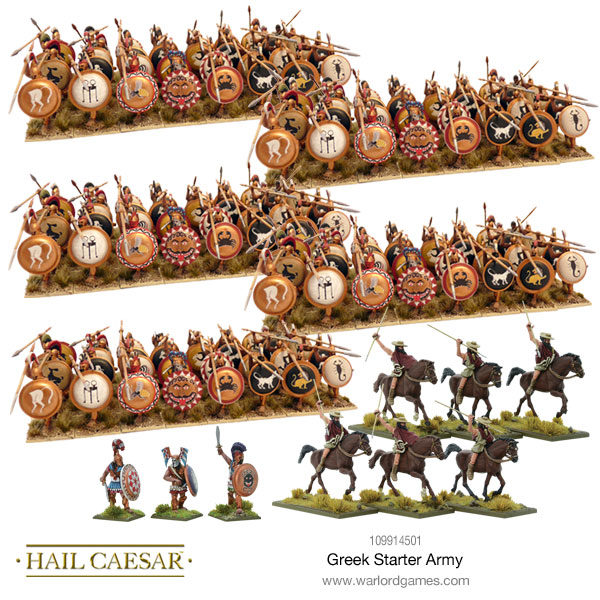
Gather your army!