An Antares hobby article by Wayne Clayton
It has often struck me as odd how rare it is to see a spaceship on the gamers table, and the ones that do appear often lay scattered across the battlefield in smoking ruins. So I decided to attempt to build one from scratch!
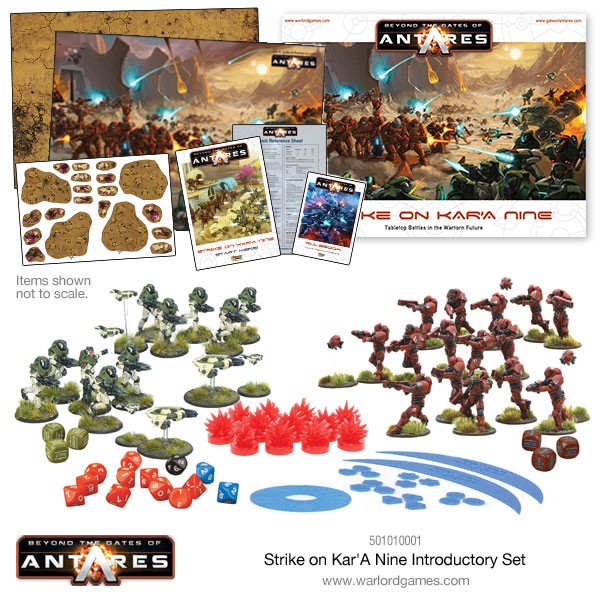
The primary goal was to create a ship large enough to believably contain the Concord force found in Strike Vector One: The Xilos Horizon box set, plus a hold big enough to house an uncompacted C3M4 Combat Drone should the need arise.
The secondary goal was to build a ship without kit bashing, the reason being that I had no model kits to bash! Therefore, building materials would have to be whatever was lying around.
The first step was to make a simple box out of scrap paper, roughly the dimensions of a proxy C3M4. The second step was to place the cardboard tube of a well-known potato snack on top of it. Immediately, two important lessons were learned: first, my box needed to be stronger, and second, the tube would roll off, so I would need to make the box into a cradle for the tube.
Armed with this knowledge I made a new box out of balsa wood with semi circles cut into the top at either end. This was made by temporarily wrapping sandpaper around the tube and using it to form the holes. Then I sat back and examined at the result, an important stage as, without a plan to work, I would have to do this a lot during the course of the build.
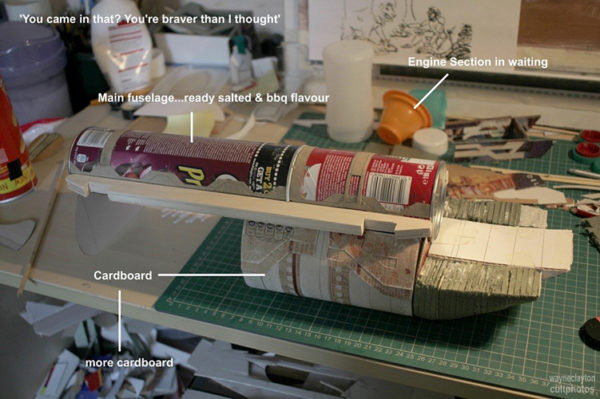
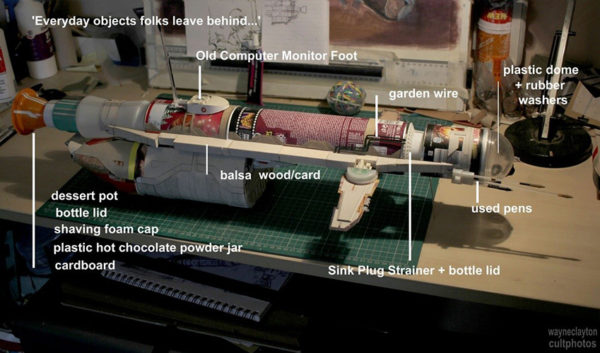
It was clear the main fuselage needed to be longer, so a second tube was cut in half and the void inside filled with old polystyrene packaging before sticking it was stuck to the first, both to add strength and to have something solid to stick things into later if required. Then the tube was stood on end (an important step) as various plastic lids and containers were balanced on top (remember the examination stage?) in order to find the right combination to form the engine section.
The final selection for the engine section ended up being one plastic jar, a shaving foam cap, a bottle lid and a dessert pot. These were threaded onto a wooden BBQ skewer and glued, with enough left at one end to stick into the centre of the metal end of the cardboard tube. Of course, I made sure it was straight and level…
Having decided the cargo bay should resemble the shape of a transport plane, I cut templates of the required shape and stuck them on the front and back of my box, with ‘ribs’ glued along the sides to continue the curved shape. Thin card was then wrapped around the box to create an outer skin which was glued along the ribs and held in place by many rubber bands.
Though I tried to place these along the line of the ribs, hindsight showed this was not the best way as the rubber bands dug in where there were no ribs beneath them. However, the experience paved the way to a better solution which was used to complete the more complex curved rear section of the cargo bay.
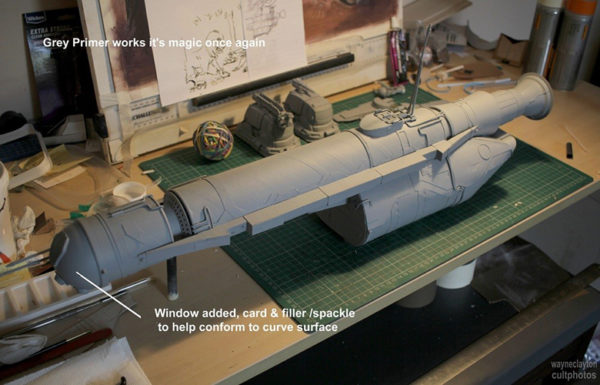
The rear section was built by cutting out 2D cross sections of the shape at points along the hull to define its shape, a gradually tapering form. These were then slotted into two strips of card to form a skeleton framework – ribs or bulkheads if you will. Remember the gaps that had caused a problem? I did: these were filled in using layers of 5mm foam underlay flooring tiles stuck together using PVA glue which was then shaped using a knife resting on the cross sections as a guide until they lay flush with the frame and formed the transition contours between the cross members. The whole assembly was then sanded, covered with filler/spackle, then sanded again until smooth.

With the basic form complete, panel shapes echoing the design of the C3M4 were cut out from card and layered onto the hull – at times making use of a hole punch to add extra detail! Once more, rubber bands helped the panels conform to the curves (according to an old craft book I later found, steaming the card briefly beforehand might have made this easier). Door and ramp detailing was added at front and rear and underneath, the base of the cargo hold was made into a single, large landing pad rather than struggle with making load bearing legs.
To help disguise the cardboard tube-ness, more balsa wood was attached to the fuselage as sponsons together with more panels to break up the smooth surfaces. Rooting through a box of old computer bits resulted in an old monitor stand which resembled a U-boat conning-tower, complete with a hatch, and adding a cardboard skirt to this helped blend it to the curve of the tube.
Though the project was going quite well, it was clear that to balance the whole design the front fuselage would need to be extended (remember the design objectives?). Instead of just adding another tube, a 99p, plastic sink plug strainer of just the right diameter was coupled to another bottle cap of the same type as used in the engine section. This created a neck to which a mini snack tube could be attached to form a head/cockpit.
The final touch was the discovery that the rubber bands came contained within a clear plastic ball which separated in two halves. This dome proved to be the perfect fit to the tube lid!
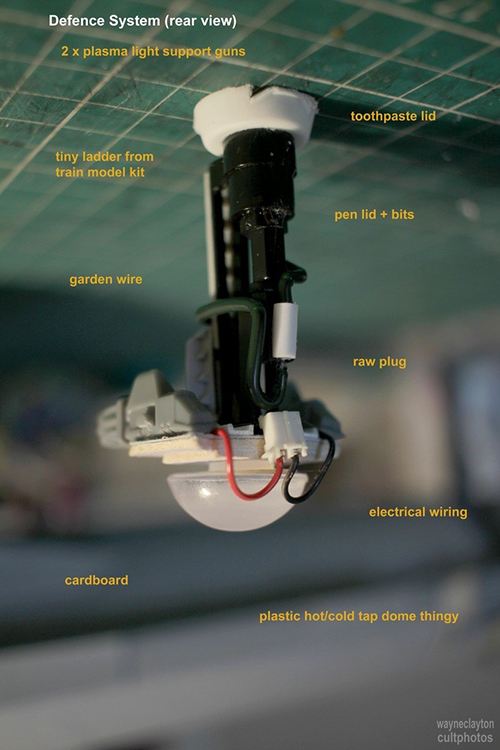
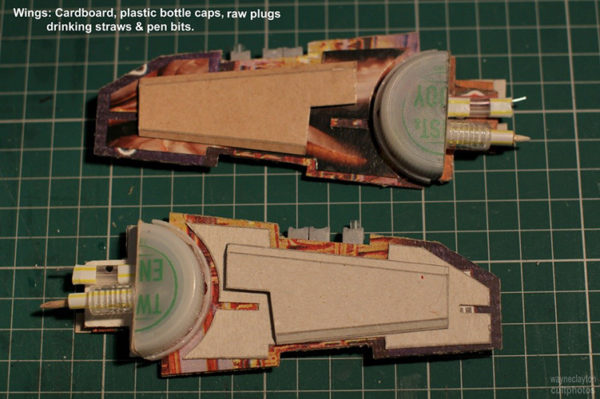
Wings were made with card layers, a drinking straw, bottle tops and trimmed down raw plug for guns. Holes were drilled to connect them to the main body via toothpicks & wire.
More detail was added with coated garden wire bent with long nose pliers (pipework), wheels pulled from an old toy (thrusters), and bits of pens, electrical connectors and wall plugs (weapons system and communications array at the front and behind the tower). Stick-on googly eyes were used as navigation lights!
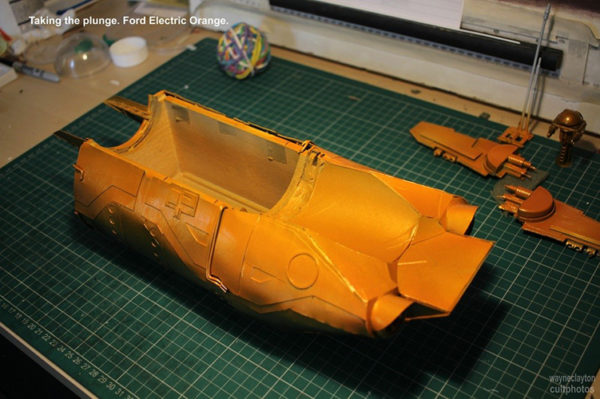
The core construction work was complete, the ship in two sections comprising the fuselage and cargo bay, deliberately kept apart to make painting easier. Before spraying, everything was sealed with watered down PVA. Before applying the main component of the undercoat – grey primer – the top was given a light dusting of white on top and the underneath a dusting of black, the white and black in an attempt to create some form of pre-shading. All the undercoats were applied using spray cans, simply because I don’t have a spray gun!
Following this basecoat, areas to be hand painted later were masked off. Then a can (well, two cans) of Ford Electric Orange car paint was used to add colour. Like my Concord army, the whole colour scheme was inspired by classic 1970’s sci-fi book cover artists: they were never afraid of using lurid colours so why should I?
Before moving on, several layers of Pledge Multi-Surface Wax (UK version of Klear) was applied with a brush in order to seal the paint. Light weathering and washes were applied to the few panel lines then everything was sealed again with more Pledge.
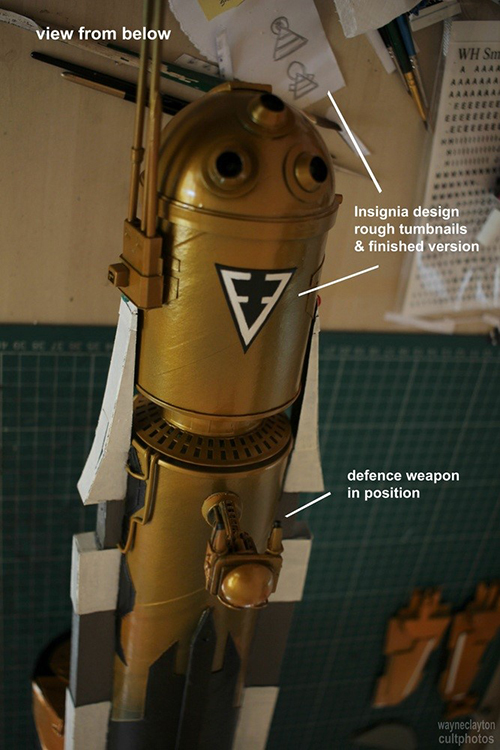
The final steps were to add the graphic details. I picked a typeface from my old battered college Letraset catalogue called ‘Data’ 1970 and hand drew the lettering to the size I wanted onto tracing paper, chalked the reverse side then drew over it again to transfer the lettering to the model. With the outlines in place, the shapes were painted white with a border of Army Painter Lava Orange.
I’m no sign writer but I was very happy with the end result, although lettering on a curved surface is not fun! With another lesson learnt, I simply drew the ship’s insignia panels onto the card, painted that first, and only then stuck them onto the model.
Finally, it was time to assemble the ship, the fuselage being glued to the cargo bay at as many points of contact as could be found. I confess it was now I discovered it was a little nose heavy so a little packing was needed shore things up, a problem that could have been easily sorted if I had added a little more ballast inside the engine section earlier in the process. Likewise, the wings were attached and whilst there was a little wing drooping, this actually echoed the C3M4 design so was left alone as a happy circumstance!
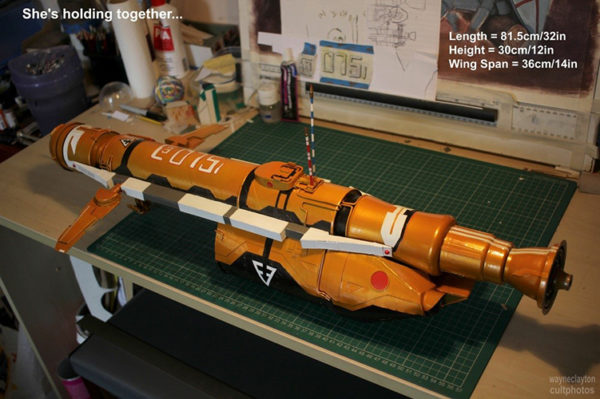
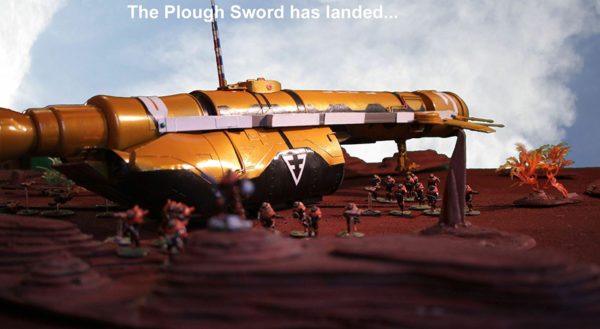
So now I have a spaceship, the Plough Sword! By no means is it the biggest ship in the fleet, or even the prettiest, but is a spaceship, nonetheless. And once placed on the table top, surrounded by its Concord troops, it really did feel perfectly at home, not just a terrain piece, or LOS blocker, but potentially a fully fledged character with its own role to play and stories to tell.
Maybe it’s time to turn on the landing lights and welcome careful drivers from Beyond the Gates of Antares to your gaming tables too?
Share your work with the Community
Do you have something to share with the Beyond the Gates of Antares community, an article, scenario, paint scheme, build or something that other players would find interesting or fun? If so, we would love to hear from you as we’re looking to add great articles to the Beyond the Gates of Antares online resources.
For more details, download and read our guidelines and get in touch with our Antares focus, Tim Bancroft: