Alan Mander of Mandertory Miniatures lept at the chanceto get to grips with the fabulous model and in this article describes how he built our fully modelled Pegasus Bridge gaming table:

Board Frame work
To start with we made the frame and base for the board.
For this we used:
6×4 sheet of 6mm MDF
32ft of 1½ x ½ inch planed timber.
1½ inch wood screws
The timber was cut into:
2x 6ft lengths
4x 3ft 11 inch lengths
2x 1ft 11 inch lengths
The frame was built by screwing the 6ft lengths and two of the 3ft 11 lengths into a rectangular shape (it is worth pre-drilling the wood before hand). This basic frame was then fitted to the 6×4 board by screwing through the board. Then the other two 3 feet 11 lengths were fitted to provide support for the centre of the board at 2 ft intervals. The 1ft 11 lengths were then attached (one at either end) to the middle of the 3ft 11 lengths. The bottom of our board now looked like this:

All our boards are built with this wooden baton bracing to prevent the MDF from warping.
Sculpting the board
For this you will need:
3 inch thick Insulation foam (preferably a single 6×4 sheet)
No Nails glue
Sandpaper
Bread knife/ steak knife
Scalpel
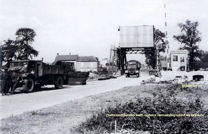
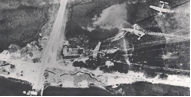
The insulation foam was attached to our base unit with No Nails glue. Whilst this was drying (it takes about 30mins before you can start to work on it), we put the bridge on the board (slightly off centre so that we had more space on the side that the Gliders landed on. We then used the reconnaissance pictures taken during WW2 as a guide for marking out where all the roads, pillbox, gun emplacement, Café Gondree (with gardens), trenches, MG nests and pond went.
Below are some aerial reconnaissance pictures of the bridge taken just after the landing and a picture showing where the bunker was.


Starting at the Cafe Gondree end of the board, the edges of the roads were sanded to raise the from the rest of the board slightly. The same was done for the Cafe (leaving the area where the cafe stands unsanded). The ‘flat’ areas of land where then also sanded to give them an uneven texture. The trench sections where dug out carefully using the steak knife (any other suitably sharp knife would equally suffice), to the depth of around an inch. We used a miniature as a guide – once only the miniature’s head was visible that was the right depth for the trench.


The river was then cut out of the foam; you need to cut down 2 inches leaving an inch of foam to create the river. In this inch we sculpted the foam to create the flow of the river, by creating slight undulations.
The banks were also shaped at this point – on the Cafe Gondree side the bank was sloped down to the towpath that runs alongside the canal. From the corner of where the bridge sits, down to the towpath, a small access ramp was carved into the bank.

At this point the base for the bridge was also created. By looking at pictures of the bridge you can see that it has concrete foundations that extend into the canal. The ones on the board are slightly larger that real life to create a sturdy base for the bridge. This base was then sanded 5mm lower than the roads joining up to it to allow for the depth of the road on the bridge. This meant that when the bridge was in place it sat flush with the roads.
On the opposite river bank we sculpted a concrete wall (on the control tower side of the bridge) that runs into the foundations of the bridge. On the other side of the bridge a sloped bank was sculpted with a pier jutting out of it (see photos).

The roads on the Bunker side of the river where then sanded in a similar manner to the Cafe side to raise them slightly. The open areas of ground where also unevenly sanded (except for where the bunker and gun emplacement sit- these where left flat so that they sit flat on the board). The trenches where also dug out in a similar manner to the other side and the pond area was dug out and sanded smooth (so that it appeared flat).
The board was now ready for texturing.
First we removed all of the drop terrain off the board.
Then we attached tree bases to the board using the hot glue gun.
For the trenches, the wooden boarding was made by cutting thin strips of Balsa wood to the height of the trench wall and glued into place with the hot glue gun.

The Cafe outside seating area was created using a sheet of cobbled flooring. A wall was then added in an L shape from the Cafe along the seating area using Foam board that was the covered in Milliput and smoothed to make it look like a plastered wall.

The River was textured first using filler mixed with PVA (wood) glue to the consistency of runny porridge. This was then poured onto the board and smoothed out a dampened 3 inch brush. Once the river was completely covered, starting at one end (and working in the same direction along the entire river) we used the brush to create wavy lines representing the flow of the river. We also used this filler mix on the towpath, pier, concrete river bank and bridge foundations. The posts on the pier were made from dowelling and pushed into place while the filler was still wet. Likewise the wooden jetty in the river and the posts that support the bridge control tower were added at this time. These were made out of Balsa wood and pushed into place in the wet filler mix.
Once the river was dry we mixed up kiln dried sand and PVA glue (to the consistency of soggy Wheatabix) and painted it onto the rest of the board. While it was still wet, more kiln dried sand was sprinkled onto the roads, to create the asphalt texture.
Fine modeling gravel was also sprinkled liberally down the banks of the river and on the flat open areas (being careful not to get any onto the areas where the bridge and buildings would sit).
The board was then left to dry, until the sand and PVA had dried hard. At this point sand bags were made from Milliput and attached to the top of the trenches.
Painting the Board
First of all the entire board was painted in a base coat of Vallejo Chocolate Brown – to use Vallejo for this would be quite expensive so we took a pot to our local DIY store and got them to mix up a matt emulsion equivalent (in this case it was Dulux Velvet Truffle 2).

Once this was dry all of the open areas of ground and river banks where given a heavy drybrush of Vallejo Flat Earth (again we got a tester pot of matt emulsion mixed up – Dulux Summer Pecan 1), then a light drybrush of Vallejo US Tanned Earth (Dulux Summer Pecan 2). Individual stones were picked out in Vallejo dark grey and highlighted with Vallejo light grey.

All the roads and concrete were painted next. We used an Airbrush for this; however, drybrushing would work just as well. First of all they were given a coat of Vallejo Dark Grey. This was highlighted first with Vallejo light Grey, then a 50/50 mix of Light Grey and Stone Grey. We then added white to the mix for the final highlight.
The Base coat for the river was then painted onto the board. This was a 30/70 mix of Vallejo model colour Chocolate Brown and Vallejo Game Colour Scurf Green (027). This was highlighted with Scurf Green (heavily on the ‘waves’ we’d created), then a small amount of white was added to the scurf green and this was applied to the tips of the waves and around the posts and wooden jetty.


Two thick coats of clear Gloss floor varnish (water based) we painted onto the board, don’t worry if it goes a little frothy in places as this will add to the effect of moving water.
The wood for the trenches, jetty, supports and pier posts were base coated in Vallejo model colour Burnt Umber (941). This was highlighted with Vallejo Orange Brown (981) and then wood grain was painted on using Buff (976). Once dry all the wood work was given a Sepia Wash (73200).
The Sand Bags were painted in a base coat of Burnt Umber, they were then drybrushed with German Cam. Beige WWII (821). A final drybrush of Iraqi Sand was lightly added.
The cobbled seating area at the Cafe was painted with Vallejo Dark Grey and highlighted with a drybrush of Vallejo Light Grey. The wall around the seating area was likewise base coated with Dark Grey, followed by a heavy drybrush of Light Grey then a final drybrush of White.

From around an inch in from the edge of the pond was painted in a 60/40 mix of Chocolate brown and Scurf Green. For the very centre of the pond a small amount of black was added to this mix to darken it to give the illusion of depth. The pond was then given a thick coat of Gloss Varnish.
The roads were then weathered using MIG Weathering powders. First of all Dark Mud was brushed onto areas that would see a lot of use. This was then worked into the road with a large brush. After that Europe Dust was brushed onto the roads, focusing around the edges and to provide a top coat to the Dark Mud. Again this was worked into the board with a large brush. The roads were then given a dusting of the final highlight colour with the airbrush to tie it all together.
Adding Foliage to the board
The board was flocked (lightly in areas were there would be heavy foot traffic) with our own mix of medium green Static Grass.
The reeds were then added to the edge of the pond using a pin vice to create holes for them and pushing them into place with a small amount of super glue. Likewise the long grass in the area around the pond and on the river bank was added in the same way.


Once the Reeds had been placed a two part resin water effect was mixed together and poured over the pond.
Static Grass Tufts of various summer colours and Static Grass flowers were added to the board. We then added bits of Clump Foliage attached with hot glue. This was placed between the tree bases and in the Cafe Gondree Garden.
Clump foliage was added to the tree armatures and the trees were pushed into place on the board.

Finally we added barbed wire around the trenches on the pond side of the river. The Barbed wire was painted with Rust weathering powder mixed with Burnt umber oil paint and thinners. Whilst this was drying the wooden supports were made from Balsa Wood and painted in the same manner as the tench boarding. The supports were then super glued to the board then the barbed wire was placed over them and super glued into place. To provide extra strength the board was drilled at the end of each section with a pin vice and the barbed wire was pushed into the hole with super glue.


Should you need any more advice on creating your boards don’t hesitate to email us at info@mandertory-miniatures.co.uk. Now head over to have a look at Pegasus Bridge the movie and give them your support!